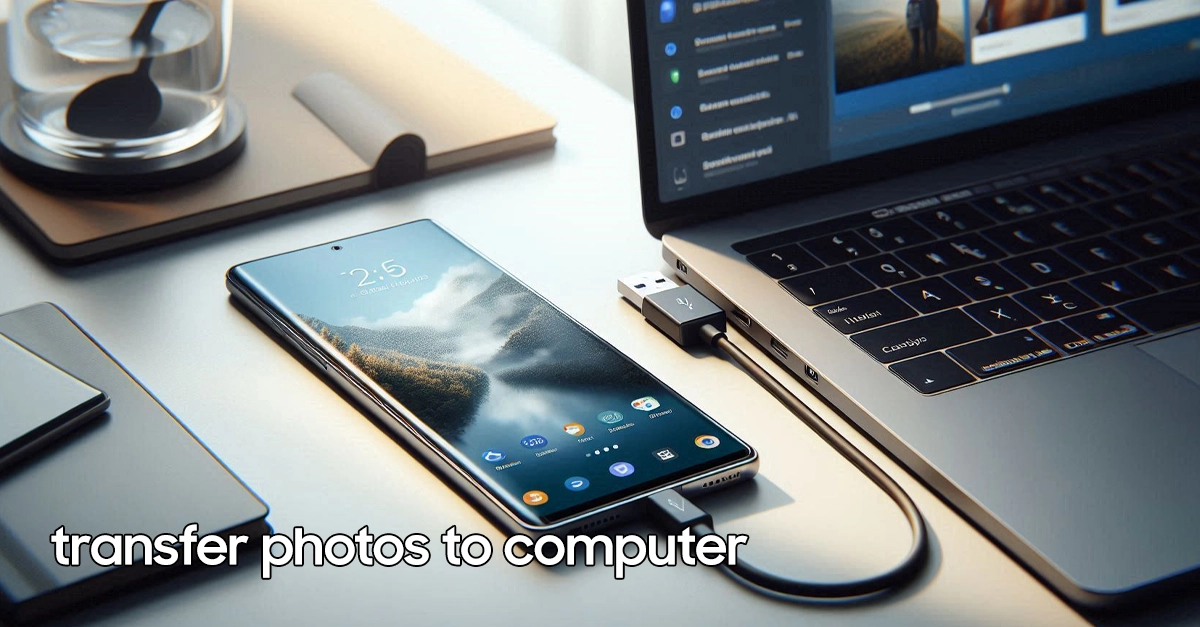
You just captured stunning 200MP photos or capturing a screenshots with your new Samsung Galaxy S26 Ultra, and now you need them on your computer for editing, backup, or sharing. knowing how to transfer photos from S26 Ultra to computer efficiently is an essential skill. This reliable method—from quick USB cable connections to seamless wireless options—so you can move your images safely and get back to shooting.
This comprehensive guide walks you through six proven methods to transfer photos from S26 Ultra to computer—covering both Windows PC and Mac solutions.
From the fastest wired connections to convenient wireless options, you’ll find the perfect approach for your workflow.By the end, you’ll transfer photos like a pro, regardless of your technical experience.
Methods to Transfer Photos from S26 Ultra to your Computer
Transferring photos from your Samsung Galaxy S26 Ultra to a computer doesn’t have to be complicated. Here’s some methods you can follow:
Method 1: USB Cable Transfer (Fastest & Most Reliable)
The USB cable method remains the gold standard for speed and reliability when you transfer photos from S26 Ultra to computer. This approach works with both Windows and Mac, though the setup differs slightly.
For Windows PC:
- Connect your S26 Ultra to your computer using the USB-C cable included in your box.
- Unlock your phone and swipe down from the top to access notifications.
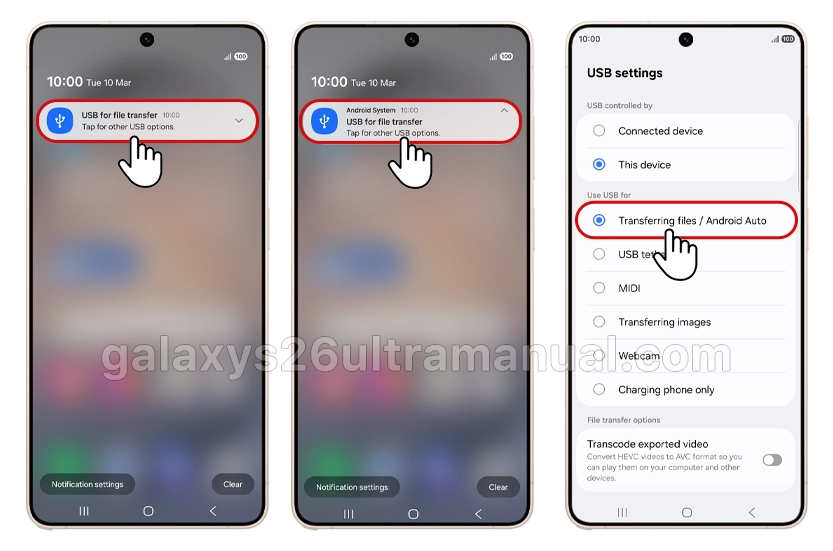
- Tap the USB notification and select “Transferring files / Android Auto”.
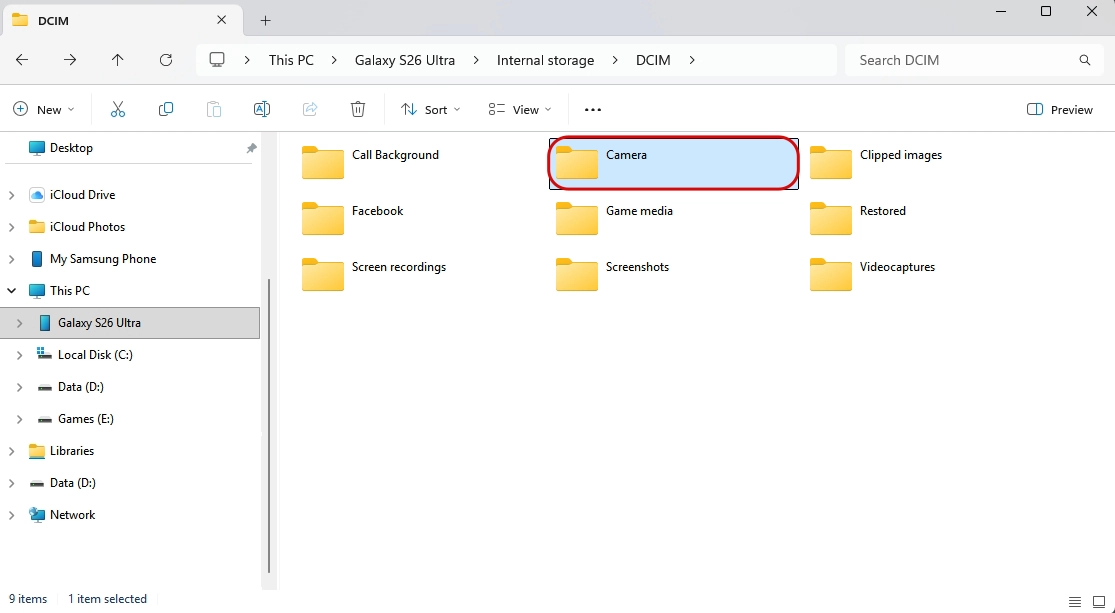
- Open File Explorer on your PC—your phone appears under “This PC“.
- Navigate to DCIM > Camera to find your photos.
- Drag and drop or copy-paste files to your desired folder.
Pro tip: If your PC doesn’t recognize the device, try a different USB port or cable. Some third-party cables only support charging, not data transfer.
For Mac:
Mac computers require additional software since macOS doesn’t natively support Android file transfer protocols.
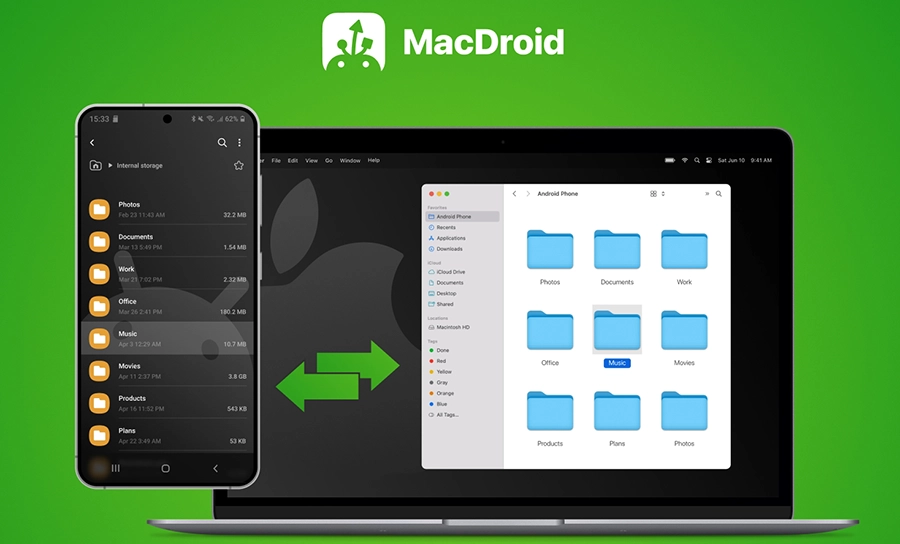
- Download Android File Transfer or alternative software like MacDroid.
- Connect your S26 Ultra via USB-C cable.
- Select “File transfer” on your phone when prompted.
- Browse the Android File Transfer window to locate your DCIM folder.
- Drag photos to your Mac’s desired location.
Important: Samsung recommends using the official cable or certified USB-C cables that support MTP connections for reliable data transfer.
Method 2: Link to Windows (Seamless PC Integration)
Samsung’s deep integration with Windows makes wireless transfers effortless. The Link to Windows feature (also called Phone Link) lets you access your S26 Ultra photos directly from your PC without cables.
Setup Process:
- On your S26 Ultra: Go to Settings > Advanced features > Link to Windows.
- Sign in with your Microsoft account.
- On your PC: Open the Phone Link app (pre-installed on Windows 10/11).
- Pair the devices using the on-screen QR code.
- Allow permissions for photo access.
Transferring Photos:
Once connected, the Phone Link app displays up to 2,000 of your most recent photos and videos. You can:
- View photos directly in the app.
- Copy files to your PC clipboard.
- Save as to download permanently.
- Drag and drop to desktop folders.
Limitations: Phone Link shows only recent media and doesn’t support full gallery browsing. For bulk transfers, use USB or cloud methods instead.
Method 3: Samsung Smart Switch (Best for Bulk Transfers)
Smart Switch isn’t just for migrating from old phones—it’s also a powerful backup tool for transferring photos from S26 Ultra to computer.
Backup to PC/Mac:
- Download Samsung Smart Switch on your computer (available for Windows and Mac).
- Connect your S26 Ultra via USB cable.
- Open Smart Switch and wait for device recognition.
- Select “Backup” and check the Photos category.
- Click “Backup” and wait for completion.
Key advantage: Smart Switch creates organized backups including albums, timestamps, and metadata. However, it backs up your entire gallery rather than individual selections.Restoring: If you ever need these photos back on a Samsung device, Smart Switch restores them exactly as organized.
Method 4: Cloud Storage (Access Anywhere)
Cloud services offer the most flexibility, letting you transfer photos from S26 Ultra to computer without cables or immediate access to your phone.
Google Photos (Recommended):
- On your S26 Ultra: Open Google Photos app.
- Enable “Backup and sync” in settings (uses your Google account storage).
- On your computer: Visit photos.google.com and sign in.
- Select photos and click the download button.
Samsung Cloud:
Samsung’s native cloud service integrates directly with your Gallery app:
- Go to Settings > Accounts and backup > Samsung Cloud.
- Enable Gallery sync.
- Access via browser at support.samsungcloud.com.
OneDrive & Dropbox:
Both apps offer automatic camera upload features. Install the app, enable auto-upload, and access files from any computer browser.
Considerations: Free tiers offer limited storage (typically 15GB for Google). For heavy photographers, consider upgrading to paid plans or using local transfer methods for large batches.
Method 5: Quick Share & Nearby Share (Device-to-Device)
For transferring to nearby computers (especially Windows PCs with the Quick Share app), Samsung’s Quick Share feature offers instant wireless transfers.
Using Quick Share:
- Open Gallery on your S26 Ultra.
- Select photos you want to transfer.
- Tap the Share button and select Quick Share.
- Select your computer from the nearby devices list.
- Accept the transfer on your PC.
Requirements: Your PC needs the Quick Share for Windows app installed, and both devices must be on the same Wi-Fi network .
Nearby Share (Google’s alternative) works similarly for Mac and Windows users who prefer Google’s ecosystem over Samsung’s proprietary solution.
Method 6: USB OTG (No Computer Connection Needed)
Your S26 Ultra supports expandable storage via microSD card (depending on region) and USB OTG (On-The-Go) flash drives—perfect when computer access is limited.
Transfer to USB:
- Insert USB OTG drive into your S26 Ultra.
- Open My Files app (found in the Samsung folder).
- Navigate to Internal storage > DCIM > Camera.
- Select photos and tap Move or Copy.
- Choose USB storage as destination.
Computer Transfer:
Insert the USB drive into your computer and copy files normally. This method works universally across Windows, Mac, and even Chromebooks.
Note: USB OTG requires a USB-C flash drive or adapter.
Troubleshooting Common Issues
Even with straightforward methods, you might encounter obstacles. Here’s how to resolve them:
“Computer won’t recognize my S26 Ultra”
- Try a different USB cable (ensure it supports data, not just charging).
- Switch USB ports—avoid USB hubs when possible.
- Restart both devices.
- Check for Windows/macOS updates.
“Transfer speed is extremely slow”
- Use USB 3.0 ports (blue connectors) instead of USB 2.0.
- Disable Bluetooth and Wi-Fi if using USB (reduces interference).
- Close unnecessary apps on your phone.
“Mac won’t connect to S26 Ultra”
- Ensure Android File Transfer is updated.
- Try MacDroid or SyncMate as alternatives.
- Enable “File transfer” mode on your phone (not “USB charging”).
“Photos appear blurry or low quality after transfer”
- Check if “metered data” settings are enabled (reduces file sizes to 1MB).
- Ensure you’re copying original files, not thumbnails.
- Disable “Optimize storage” features that compress photos.
Antivirus software blocking transfers
- Temporarily disable antivirus during transfer.
- Add your phone as a trusted device in security settings.
Which Method Should You Choose?
| Your Situation | Recommended Method | Why |
|---|---|---|
| Transferring 100+ photos | USB Cable or Smart Switch | Speed and reliability |
| Quick 5-10 photos to PC | Link to Windows/Phone Link | No cables, instant access |
| Mac user | MacDroid or Android File Transfer + USB | Native compatibility |
| Frequent daily transfers | Google Photos auto-backup | Set-and-forget automation |
| No internet/computer access | microSD/USB OTG | Physical media works anywhere |
| Transferring to friend’s PC | Quick Share/Nearby Share | No account setup required |
Best Practices for Photo Management
- Organize during transfer: Create dated folders on your computer (e.g., “2026-04_S26Ultra”) to maintain chronological organization.
- Backup redundancy: Never rely on one method. Combine cloud auto-backup with quarterly USB transfers to external drives.
- Preserve quality: Always transfer original files for editing. Compressed versions suffice for social sharing only.
- Secure sensitive photos: Use Samsung’s Secure Folder for private images—these require separate authentication and won’t appear in standard transfers.
Conclusion
Transferring photos from your Samsung Galaxy S26 Ultra to computer offers more flexibility than ever before. Whether you prioritize the blazing speed of USB 3.0 transfers, the wireless convenience of Link to Windows, or the anywhere access of Google Photos, there’s a method tailored to your workflow.
For new Samsung users, start with USB cable transfers for reliability, then explore Phone Link integration for daily convenience. Remember: the best method is the one you’ll actually use consistently. Set up automatic cloud backups as your safety net, and keep these manual methods in your toolkit for bulk transfers or offline situations.
Your Samsung Galaxy S26 Ultra’s camera captures professional-grade images—ensure your transfer method does them justice with organized, lossless workflows.
3 thoughts on “How to Transfer Photos from S26 Ultra to Computer: 6 Proven Methods (Windows & Mac)”