Backing up your data is one of the smartest things you can do with your phone. If you’re using the Samsung Galaxy S26 Ultra, you can easily back up your important files, contacts, settings, and more to Google Drive through your Google One backup system. This ensures your data is safe and can be restored anytime if you switch devices or reset your phone. Below is a complete step-by-step guide to help you back up your Galaxy S26 Ultra to Google Drive.
Why Back Up Your Galaxy S26 Ultra to Google Drive?
Regular backups ensure you can restore your personal information quickly if you switch to a new phone or need to reset your device. Google Drive integration with Android provides seamless synchronization of photos, videos, contacts, calendar events, and app data without requiring third‑party software.
Official Samsung support confirms that enabling Google Backup is one of the simplest ways to secure your Galaxy S26 Ultra data.
Prerequisites for Google Drive Backup
Before you begin, make sure you have:
- A Samsung Galaxy S26 Ultra charged to at least 50% or connected to a power source.
- A stable Wi‑Fi connection (required for automatic backups).
- A valid Google account (Gmail) signed in on your device.
- Sufficient Google Drive storage space (Google offers 15 GB free; additional storage via Google One if needed).
Step‑by‑Step Guide to Back Up Galaxy S26 Ultra to Google Drive
Follow these instructions to initiate a manual backup or enable automatic backups.
Step 1: Open Settings
Unlock your Galaxy S26 Ultra and tap the Settings app from the home screen or app drawer.
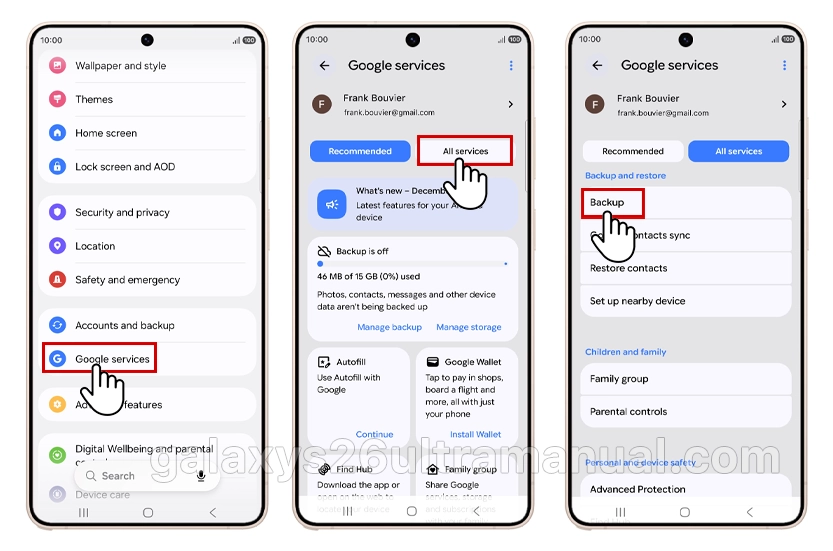
Step 2: Navigate to Google Services
Scroll down and select Google Services. This section manages all synchronization and backup services for your device.
Step 3: Select All service
Under the Google Services, tap All services, the select Backup.
Step 4: Choose What to Back Up
Thick for the data types you want to protect:
- Photos and videos (backs up your photos gallery to Google Photos).
- Other device data (includes contacts, call logs, messages, app data, settings, and Wi‑Fi passwords).
- You can select one or both categories based on your needs.

Step 5: Initiate Backup
After selecting your preferences, tap confirm and tap Back up now. Your device will start uploading the chosen data to Google Drive. A notification will appear when the backup completes.
For automatic backups, ensure the toggle for Back up using mobile or metered Wi‑Fi data is enabled so backups occur when your phone is idle, charging, and connected to Wi‑Fi.
Automatic vs Manual Backup: What You Need to Know
- Manual backup: Ideal for immediate protection before major changes (e.g., software updates or factory resets). You control exactly when the backup runs.
- Automatic backup: Runs daily when your Galaxy S26 Ultra meets the conditions (charging, idle, Wi‑Fi). This provides continuous protection without user intervention.
Combining both methods offers the strongest safeguard—use manual backups for critical moments and rely on automatic sync for everyday peace of mind.
Troubleshooting Common Backup Issues
If your backup fails to start or stalls, try these fixes:
- Check internet connection: Ensure you are connected to a reliable Wi‑Fi network.
- Verify Google account: Go to Settings → Accounts and backup → Manage accounts and confirm your Google account is signed in and sync is enabled.
- Clear cache: Navigate to Settings → Apps → Google Drive → Storage → Clear cache (this does not delete your backed‑up data).
- Check storage: Visit drive.google.com to confirm you have sufficient space; delete unnecessary files or upgrade your Google One plan if needed.
- Restart device: A simple reboot can resolve temporary glitches that interfere with backup services.
How to Verify Your Backup Was Successful
After completing a backup, you can confirm its success:
- Open the Google Drive app, tap the menu (☰), select Backups, and look for your Galaxy S26 Ultra entry with a timestamp.
- Alternatively, visit drive.google.com on a computer, click the storage icon in the left panel, and choose Backups to see your device listed.
If you see a recent backup with the correct date and time, your data is securely stored in the cloud.
Restoring Data from Google Drive to Your Galaxy S26 Ultra (Optional)
Should you need to recover your data—for example, after setting up a new device—follow these steps:
- During initial setup or via Settings → Accounts and backup → Restore data, select Google Drive.
- Sign in with the same Google account used for the backup.
- Choose the most recent backup file and select the data types to restore (photos, contacts, apps, etc.).
- Tap Restore and wait for the process to finish. Your Galaxy S26 Ultra will reboot and restore the selected content.
Conclusion
Backing up your Galaxy S26 Ultra to Google Drive is a straightforward process that takes just a few minutes but provides lasting protection for your digital life. By enabling automatic backups and performing manual saves before significant changes, you ensure your photos, contacts, and app data remain safe and recoverable. Remember to check your backup status regularly and visit galaxys26ultramanual.com for more expert guides on securing and optimizing your Samsung Galaxy S26 Ultra.
4 thoughts on “How to Back Up Samsung Galaxy S26 Ultra to Google Drive”